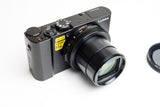
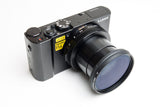
Now you can add filters to your Panasonic Lumix DMC LX10/LX15 with no vignetting throughout the entire focal range.

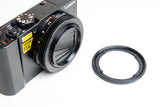
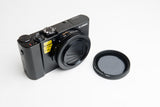
Using the Lensmate Quick-Change Filter Adapter kit, only the tiny receiver stays on the camera (it adds only 3mm to the depth of the camera). The filter/filter holder assembly bayonets onto the receiver for quick changes without having to thread the filter on and off. The filter holder is retained by a low tension locking system, so very little torque is applied to the lens barrel when attaching and detaching it.
There is no chance of flash blockage at any focal length (with the filter holder removed), since the receiver is smaller in diameter than the end of the lens barrel. It attaches to the camera using a 3M dual-sided adhesive film which holds tenaciously yet is easy to remove cleanly and safely when desired.
We designed the system so that the filter remains in the filter holder and is attached/detached as an assembly. The filter holder bayonets onto camera with less than 90 of rotation to the locked position.
The low tension locking system assures that the lens barrel won't be harmed by over-enthusiastic tightening (or loosening) of the filter. The ability to quickly change the filter without having to thread/unthread should appeal to filter users. You'll find that you're more likely to use your filters when they can be mounted and removed this easily.
Panasonic Lumix DMC LX10/LX15 Installation Instructions - no install tool required

NOTE: Sony RX100 shown in photos
- Best done at room temperature.
- Turn the camera on and remove the battery.
- Use the alcohol wipe to clean the front of the lens barrel. Use care not to squeeze excess fluid onto the camera. Allow to dry completely.
- Part 1 comes with orange tape across the part marking the 2 "ears", when the orange tape is parallel to the top of the camera, the "ears" will be level. This positioning does not affect the function of mounting the filter - it's just for aesthetics. After removing the backing from the adhesive, use the thumb and forefinger of both hands to lower the ring into position, noting the aforementioned position of the orange tape (which can be removed beforehand if preferred). If you're happy with the position of the ring, press it down lightly. If not, you can still reposition the ring to your liking.
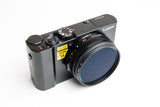
- Replace the battery and turn the camera off to retract the lens. Now press firmly on the ring, remove the orange tape if you haven't already, and installation is complete. To use, screw your filter into the holder, then simply bayonet this assembly onto the receiver and start shooting.
- Read Important Tips below.
Tip: The 3M adhesive is very secure when installed correctly and using 1 or 2 filters. However, it does not do well with lateral forces. If you are using a camera bag place the camera on its back so you can pull the camera in and out easily without rubbing the front of the camera against the side of the bag, or remove Part 2 with the filter attached.
Important Tips
1. We recommend attaching and detaching filters from the filter holder when it's off the camera. In fact, you can't unscrew the filter from the filter holder on the camera because it will just remove the filter/ holder assembly as it was designed to do. Don't over tighten the filter - it requires little force to stay attached to the holder.
2. If you use a snug fitting bag or case, we recommend removing the filter holder/filter assembly before stowing the camera. If you do leave it on, be sure to check that the filter holder is still in the locked position when you use it again.
3. Some polarizers rotate with enough friction to remove the filter holder assembly when rotated in the direction of removal. If this happens, rotate the polarizer in the direction of attachment only.
4. If you use a wrist strap, be aware that jostling can dislodge the filter holder from the camera.
Removing the Panasonic Lumix DMC-LX10/LX15 Quick Change receiver from the camera.
- Don't turn the camera on, just remove the battery so you don't accidentally power up the camera. Lay the camera on its back. Let the thread of the removal tool find the space between the receiver and the end of the lens. Pull down and across - it should easily separate the two.
- Don't reuse the same adhesive once removed as it's probably been compromised in the removal process.

How much does the Panasonic LX10/LX15 filter adapter weigh?
The combined weight of the receiver and filter holder is about 3 grams. A thin 52mm polarizer weighs about 15 grams for a combined weight of 18 grams.Will the camera be as "pocketable" with the Panasonic LX10/LX15 adapter added?
You'd probably not even notice the difference - the receiver itself adds only 3mm or 1/8" to the camera.
I am going to a hot and humid climate, is the adhesive on the part that stays on the camera still going to hold?
Yes, the adhesive is good to at least 200 deg F (~93 deg C). Humidity should not be a factor. If you want to read more about the adhesive it's 3M 9731.Can I attach a conversion lens with the adapter?
We recommend attaching only filters or macro lenses as a conversion lens weight could damage the quick change system or the cameras zoom lens.Will using the Lensmate Panasonic LX10/LX20 filter adapter void my warranty?
If you need to send the camera in for service, just remove the receiver. It will come off cleanly with no residue left on the camera.Can I reattach the filter receiver after removing it?
We don't recommend it - the adhesive is usually compromised and won't have the bond strength it had originally. We do sell the adhesive sticker separately should you need a replacement - be sure to follow our detailed instructions on the order page to ensure that the adhesive is installed correctly.
Will the receiver on the camera lens affect the built in lens cover ?
No, the tiny receiver (Part1)does not affect the automatic lens cover in any way.
Can I use more than one filter at a time?
You can stack 2 ND filters of normal depth, or one normal depth polarizer + ND filter with no vignetting.I saw on the internet someone had trouble with the B+W XS-Pro circular polarizer which is a "slim" filter and the Quick Change Filter Adapter.
For some reason the housing on the B+W XS-Pro circular polarizer is different than other polarizer brands, in that the back piece of glass, that does not move, is set closer to the threads on the backside. Our bayonet mount on Part 2 the actual filter holder uses tiny tabs, this B&W polarizer glass being set back in the housing is getting contact. The work around is to use a UV filter or a 52mm - 52mm step ring to screw the B&W polarizer to, so it's shallow backside has enough room.We have been selling our custom Quick Change Filter adapter Kit design for about 9 years now, on many different camera models, and since this single B&W Slim Polarizer is the exception to all standard filters that do fit - we feel the workaround is acceptable.
Will the quick change affect the built in flash?
The built in flash only works to about 6 feet in front of the camera, you would need to remove Part 2 when using the flash to avoid shadowing in the bottom right hand side of your image.Can I use the Sony fitted case with the Quick Change system?
Yes you may use the Canon fitted case. To close the case you will need to remove Part 2 and whatever filter you might have attached, leaving Part 1 on the camera.

